by Casey Johnson
Summer is right around the corner and what better way to kick off your outdoor festivities than by creating your very own lemonade stand for the kids. Lemonade not quite your thing, no worries! Your imagination is the limit with this quick, easy and kid friendly project. Some other ideas for this stand could be a cookie concession or a puppet show stage. Just get the kids onboard with the build and have some family fun!
 Step 1: The Crates
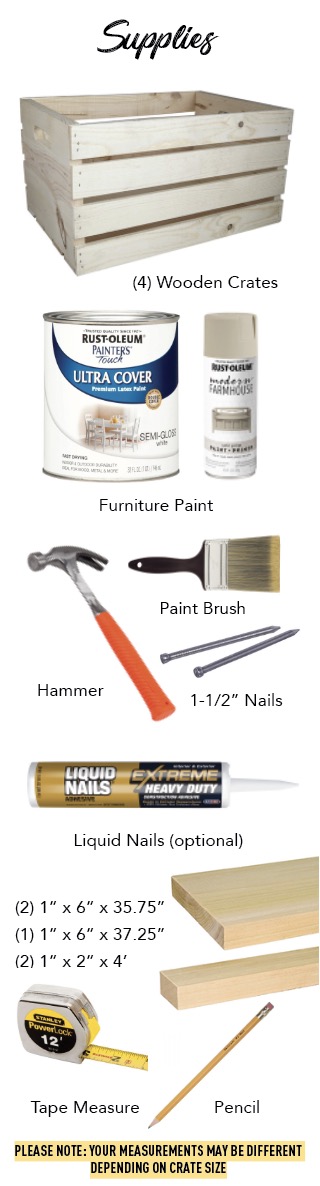
The crates are going to vary in size slightly depending on where you get them. We purchased the Wood Crate Carry All by ArtMinds® from Michaels and the size is
12-1/2”d x 9-5/8” h x 17-7/8”w.
Step 2: Painting
You can choose to either brush paint or spray paint. Personally after attempting the spray paint, I found that brushing was much easier. The spray paint took an entire can on a single crate and didnt give great coverage. Paint the inside and outside of the crates with 2 coats of paint.
Step 3: Stand Assembly
Stack your crates in an alternating pattern for decor friendly display shelving. Once your crates are stacked, simply nail your crates together at the inside 4 corners. (Tip: Use liquid nails adhesive to give a little more durability in your stand construction.)
Step 4: Counter Top
This step is optional but gives a more finished look on the stand. Measure your stand length and width. We used (2) 1” x 6” boards and cut them approx 35.75”w. There will be a slight overhang on the front and back sides of the stand, be sure to center your boards before attaching. For stain we chose Minwax Jacobean. Nail your counter top down in each corner of your two boards and in center. (Tip: Have your local lumber supplier cut your boards to length for you.)
Step 5: Stand Signage
Gather your 1”x 2”x 4’ boards for your sign posts and your 1”x 6” board. You can paint or stain them. Use a pencil and ruler to mark the center line for your post on the side panels of your stand. Attach posts with nails. Once complete you can attach your sign board to the top of your posts using nails. It will help to lay your stand over on it’s side and brace it.
Other ideas: Add casters to the bottom of your stand for easy mobility. Paint extra crates for added seating.